

Let’s start with the basics, shall we? Imagine your primary storage tank is a celebrity—flashy, essential, but prone to scandalous leaks.
Secondary containment is the no-nonsense bodyguard standing in the rain. Its job? To keep toxic gossip (or crude oil) from escaping.
The Alberta Energy Regulator notes in Directive 055, the goal is to prevent soil, groundwater, and surface water contamination. It’s like an outer wall, a fail-safe.
This isn’t just about checking a box. It’s about being responsible on a big scale. A single spill can ruin your finances and harm the environment.
So, we’re moving past the boring rules. Let’s explore the fun world of berms, sumps, and keeping things drip-free. This is your advanced guide, with a bit of humor.
Regulatory Drivers (EPA/SPCC, IFC, Local Fire Code)
If compliance were a sport, the EPA and your local fire marshal would be playing on the same field but with entirely different rulebooks. One is focused on preventing an environmental tragedy, the other on averting a structural inferno. Your secondary containment system is the unlucky ball they’re both trying to kick.
Let’s meet the key players in this regulatory drama. On the federal stage, you have the Environmental Protection Agency and its SPCC rule—the Spill Prevention, Control, and Countermeasures regulation. This is the classic “plan for the worst” directive. Its trigger is straightforward: if your facility has an aggregate above-ground oil storage capacity of 1,320 gallons or more, you need a written plan. And not just any plan—one certified by a Professional Engineer.
Think of the SPCC rule as the guardian of “navigable waters.” Its entire existence is predicated on stopping oil from reaching streams, rivers, and lakes. It’s less concerned with what happens inside your four walls and more with what might seep out and travel miles away.
Now, enter the local fire official. This person likely lives by the International Fire Code (IFC) or a National Fire Protection Association (NFPA) standard. Their hymn sheet is different. They’re not losing sleep over a distant water table. They’re having nightmares about your storage area becoming the venue for an impromptu, and very unwelcome, fireworks display.
Fire codes are obsessed with three things:
- Separation: How far is that flammable liquid from an ignition source?
- Quantities: Are you storing more than the maximum allowable amount for your building type?
- Containment: If something leaks or ruptures, will it pool and create a larger fire hazard?
This is where your secondary containment design gets pulled in two directions. The EPA might be satisfied with a berm that holds 110% of your largest tank. The fire code, on the other hand, might demand that same berm be made of specific, fire-resistant material or be located a certain distance from a property line.
Don’t assume your local jurisdiction blindly follows the IFC. Much like the mosaic of standards in Canada—from Ontario’s own Fire Code to PEI’s adoption of NFPA 1—American cities and states often amend and tweak. One town might adopt the latest IFC edition, while its neighbor might stick with a 5-year-old version with stricter local amendments.
The lesson is less about finding one “right” answer and more about conducting a symphony of compliance. Your containment strategy must satisfy a chorus of bureaucrats, each singing from a slightly different score. Ignoring the fire code because you’ve ticked the SPCC box is like locking the front door but leaving the garage wide open. Both regulators have valid, if distinct, concerns.
Ultimately, a robust system is one that passes the scrutiny of both the environmental inspector and the fire marshal. It acknowledges that a spill can be both an ecological event and a severe fire risk. Your job is to build the solution that convinces both referees you’re playing by their rules.
Sizing Rules of Thumb: More Than a Numbers Game
Sizing your secondary containment isn’t just about picking a number. It’s about knowing which failure scenario keeps inspectors up at night. You’ll hear two key rules: the 110% rule and the 10% of total aggregate volume rule. They seem simple, but they’re not.
The 110 percent rule is the main rule. Your containment must hold 110% of the volume of your largest container. It’s designed to handle a big failure, like a full tank rupture. The idea is to contain the worst single event, plus a little extra.
Regulations, like the SPCC, call this planning for a “major container failure.” But is your largest IBC tote failing all at once your “most likely” event? Or is it a disaster movie plot?
The 10% aggregate rule is different. It says your containment should hold 10% of the total volume of all containers in the area. This rule is for a scenario of multiple, smaller leaks from several containers. It’s like having insurance for a fender-bender, not an asteroid.
| Rule of Thumb | Calculation Basis | Ideal For Planning For… | The Critical Limitation |
|---|---|---|---|
| 110% Rule | Volume of largest single container x 1.1 | Catastrophic failure of one unit (e.g., tank rupture). | May be massive overkill for areas with many small containers; ignores cumulative risk. |
| 10% Aggregate Rule | Total volume of all containers x 0.10 | Multiple, simultaneous small leaks or spills. | Could be insufficient if your largest container holds more than 10% of the total volume. |
| Your Local Authority’s Interpretation | Their reading of “most likely discharge” | The scenario they are actually worried about. | This is the rule that actually matters. |
These rules are just the start. The phrase “confirm locally” means there’s a lot of interpretation. A local fire marshal might see a drum spill as the “most likely discharge.” The state environmental agency might want to plan for that IBC tote apocalypse. This is where regulations like Directive 055 come in: containment should prevent the most probable event, not just the worst one.
So, do you size for the tipped-over drum or the cataclysmic tote failure? The answer affects your cost, footprint, and compliance. The 110% rule is a good starting point. But it’s not the final word. Your final spec is a negotiation between a mathematical ideal, your actual risk profile, and the person across the desk with the stamp. Treat the rules of thumb as your opening argument, not your closing statement.
Materials and compatibility: steel vs poly vs concrete coatings
Directive 055 is clear: your liner must match the material. This choice is more than just shopping. It’s a critical engineering decision. Get it wrong, and your last defense is consumed.
Think of it as building a superhero team. Each material has strengths and weaknesses. You need to match them to your chemical foe.

Steel is the classic heavyweight. It’s strong and fire-resistant. But, it corrodes fast with acids or corrosive salts. Its rigidity means it can’t bend with settling ground or clumsy forklifts.
Polyethylene (Poly) is the versatile shape-shifter. Born from molds, poly sumps and berms resist many chemicals. They’re light and often one-piece, avoiding seam failures. For drum containment or IBC totes, poly is often the best choice.
Concrete is the foundational brute, but it’s porous. Left bare, it soaks up contaminants. Coatings like epoxy or polyurethane seal it, making it resistant to chemicals. Directive 055’s liner specs highlight the need for a barrier that matches the substance.
Choosing the right material is a three-part puzzle:
- Chemical Resistance: This is non-negotiable. Will your material shrug off a spill or dissolve? Compatibility charts are your bible, not a suggestion.
- Environmental Suitability: Outdoor? You need UV resistance (poly often has it, coatings provide it) and a plan for precipitation. Indoor? Consider floor load and traffic.
- Structural Demands: Will a 10,000-pound forklift drive over it? Steel and thick, reinforced concrete can handle it. Poly needs specific reinforced designs.
That third-source fire code advice nails it: “The fire-resisting material must be compatible with the hazardous chemicals…” It’s a unified chant from regulators. A steel sump might be fire-resistant, but if your chemical melts it, you’ve just created a molten, spreading hazard.
For your drum containment pallets or secondary units for IBC totes, poly often wins on cost and compatibility. For large, permanent tanker offload areas, coated concrete or steel might be the industrial-grade answer. The choice isn’t about good or bad. It’s about right or disastrous.
Selecting the wrong material isn’t just a failure. It’s a poetic failure—your fortress betrayed from within by the very force it was built to contain. Get the chemistry right first. Everything else is just details.
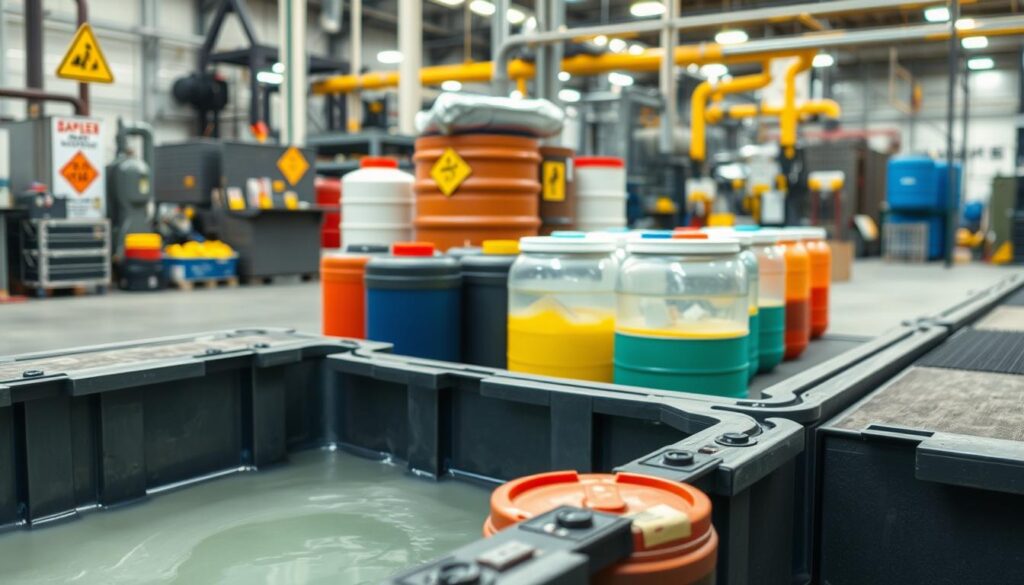
Choosing for format: drums, IBCs, small packs, tanker offload areas
Think of your hazardous materials storage as a casting call. Each container format, from the humble drum to the massive tanker, demands a specific containment co-star. Get the pairing wrong, and you’re not just breaking a scene—you’re risking a real-world environmental drama.
One size fits none. Your containment must match its dance partner, whether it’s holding production fluids, aggressive chemicals, or oilfield waste. Let’s break down the roster.
The Solo Artist: The 55-Gallon Drum
A lonely drum is a simple scene. For this container, a basic spill pallet or containment deck is often sufficient. Think of it as a cozy studio apartment for your hazardous material. It’s a mobile, cost-effective solution for a single actor. These units are perfect for those “mobile/portable container” scenarios mentioned in the codes.
Just ensure the pallet has enough capacity for 110% of the drum’s volume. You’re containing a spill, not hosting a pool party.
The Supporting Cast: IBC Totes
Step up to the 275 or 330-gallon IBC tote, and you need a more substantial stage. A standard spill pallet won’t cut it. You need a dedicated IBC tote containment pallet, often with an integrated sump.
These platforms are the workhorses for bulk chemicals and fluids. They’re designed to handle the weight and footprint of the tote while providing serious spill capture. It’s the difference between a puddle and a pond.
The Ensemble: Small Packs & Bottles
What about boxes of bottles or stacks of pails? This is where a fire-rated safety cabinet with a built-in spill containment sump enters, stage left. It’s the organized, secure dressing room for your smaller, more volatile players.
This approach neatly contains drips and leaks from multiple small containers. It keeps your “chemicals” tidy and compliant, specially in lab or workshop settings.
The Headliner: Tanker Offload Areas
Now for the main event. The tanker offload area is your Broadway show. Here, you’re thinking big: large concrete or polymer-lined berms capable of containing a major hose rupture.
We’re talking about the containment of bulk containers on a grand scale. These areas often integrate trench drains and separation sumps. It’s the difference between containing a spilled glass of wine and the bursting of a champagne fountain at a wedding.
Your format dictates the entire narrative. To make the choice clearer, here’s a quick comparison:
| Container Format | Typical Capacity | Recommended Containment | Key Consideration |
|---|---|---|---|
| 55-Gallon Drum | 55 Gallons | Standard Spill Pallet or Deck | Mobility; perfect for single, portable units. |
| IBC Tote | 275-330 Gallons | Dedicated IBC Tote Pallet with Sump | Must support heavy weight and full footprint. |
| Small Packs (Bottles/Pails) | Varies | Safety Cabinet with Integrated Sump | Organization and fire protection for multiple small hazards. |
| Tanker Offload Area | Thousands of Gallons | Engineered Berms with Drains | Designed for catastrophic failure; often requires permanent installation. |
So, ask yourself: what’s playing at your facility tonight? A one-drum show or a tanker-sized spectacular? Your containment strategy should always get top billing.
Integration with floors, ramps, and forklifts
The talk about ‘civil works’ and ‘engineered foundations’ is more than just paperwork. It’s the key to making sure your containment system works well. A sump won’t do its job if a forklift can’t reach it safely. Or if the ramp leading to it is a spill hazard.
Integration is all about making things work together smoothly. Directive 055 focuses on subgrade preparation and engineered foundations for a reason. We’re not just placing a tub on the ground; we’re creating a system where everything works together.
Let’s look at the three main parts of this system. Each needs special design to avoid problems.
| Integration Element | Design Challenge | Common Failure | Engineering Solution |
|---|---|---|---|
| Floors | Channeling spills toward sumps without creating tripping hazards or pooling zones. | Flat slabs with no slope, or excessive slope that causes vehicle instability. | Reinforced concrete with a gentle, consistent slope (1-2%) toward designated sump locations. Integral curbs to define containment zones. |
| Ramps | Providing safe access into containment areas for laden vehicles. | Steep slopes that launch forklifts, lack of curbs allowing runoff escape. | Maximum 10% slope (1:10 ratio) with textured, non-slip surfaces. Integral side curbs minimum 4 inches high to contain wheel wash. |
| Forklifts | Navigating the space without damaging berms or compromising sump integrity. | Turning containment berms into speed bumps, leaking fluids directly onto the floor. | Clear access aisles (minimum 4 ft wider than vehicle), protected sump edges with reinforced collars, and designated “no-stationary-idling” zones. |
The forklift is a powerful tool that needs respect. Its weight, turning radius, and leaks can cause problems. A sump that’s hard to reach is doomed to need repairs.
Good integration means making the right action easy. Can drivers easily find the containment area? Does the floor guide spills to the sump? If yes, you’ve created a system that works well.
Outdoor considerations: precipitation management, freeze protection, UV resistance
When you move secondary containment outdoors, you’re not just containing spills; you’re entering a battle with the elements. Rain, snow, sun, and freeze-thaw cycles are nature’s wrecking crew, and they didn’t get the memo about your SPCC plan. Your spill pallets and sumps must now perform as active hydrological features, not passive tubs. It’s a whole new game.
Let’s start with precipitation. That rainstorm isn’t a scenic backdrop; it’s a volume calculation. Your containment’s capacity must account for the “what if” of a downpour and a leak happening simultaneously. This is where freeboard—the empty space above your calculated containment volume—becomes your best friend. Without it, you’re one heavy rain away from an unplanned discharge.
Directive 055 talks about managing “run-on/runoff.” In plain English, you need a plan for the water that wants to flow into (or out of) your containment area. Will you slope the surrounding pavement? Install a pump? A frozen or overflowing sump is a compliance failure waiting to happen. You’re not just fighting leaks; you’re negotiating with the weather.

Now, let’s talk about the cold shoulder. Freeze protection is non-negotiable. A frozen sump is a full sump—useless in an emergency. But the damage goes deeper. Ice expansion can crack polymer spill pallets like a walnut and heave concrete slabs, creating leaks in your primary defense. Think of it as water’s revenge. You need heating elements, insulated enclosures, or a rigorous schedule to pump out standing water before the temperature drops.
Lastly, the silent destroyer: the sun. UV resistance isn’t a premium feature for polyethene berms and pallets; it’s a survival trait. Without UV stabilizers, your containment will become brittle and crack, resembling a cheap plastic lawn chair left out for one too many summers. The sun’s rays don’t just fade colors; they break down polymer chains. If your equipment is outdoors, specify UV-resistant materials. Period.
| Outdoor Challenge | Primary Impact | Key Solution | Material Consideration |
|---|---|---|---|
| Precipitation & Run-off | Overflow, regulatory discharge violation | Calculate freeboard, implement pump-out plan | All materials must handle prolonged water exposure |
| Freeze-Thaw Cycles | Ice-locked capacity, structural cracking | Heating systems, insulation, proactive water removal | Avoid non-flexible materials prone to cracking; steel may corrode |
| UV Radiation | Material embrittlement, cracking, failure | Specify UV-stabilized polymers, use protective covers | Polyethene requires UV additives; steel and concrete are inert |
So, what’s the takeaway? Moving containment outdoors turns a static piece of equipment into a dynamic system. You’re managing a mini-ecosystem of water, temperature, and light. It requires a different mindset—one that anticipates Mother Nature’s next move. She’s the ultimate regulator, and she never grants variances.
Your outdoor spill pallets and sumps need to be as resilient as your safety culture. Plan for the rain. Defend against the freeze. Shield from the sun. It’s not just about containing a spill anymore; it’s about weathering everything else.
Inspection/maintenance of sumps and berms
A sump without regular checks is like a dead smoke alarm. It looks like it’s working but isn’t. Laws like Directive 055 require regular checks to keep these systems working right.
Regular checks might not be exciting, but they’re key to safety. They help prevent spills before they happen. It’s about keeping your safety net strong.
What does a good check-up involve? It’s more than just a quick look. You’re searching for signs of trouble early on.
Cracks and corrosion are big problems. A small crack in concrete or a tiny hole in a sump can lead to leaks. Is that just rust, or is it serious? Always document any damage.
Sediment buildup is sneaky. Sludge at the bottom of your sump might look harmless but it’s not. It can reduce your sump‘s capacity, leading to spills.
Then there’s debris like leaves or packing materials. They might seem small but can block drains. This can turn your sump into a big problem during rain.
Don’t forget to check seals, gaskets, and coatings. These protect your sump from chemicals. If they fail, it can be a big problem.
Regular checks are important because problems often start small. A small crack can turn into a big spill. Your inspection log helps figure out if a spill was an accident or a mistake.
Maintenance fights against decay. It keeps your sump in good shape. Without it, you’re just waiting for a spill. The best sump is useless if it’s not checked regularly.
Incident documentation and reporting links to spill plans
When the containment berm holds and the leak is stopped, the real work begins—paperwork. This part feels like a victory lap after winning the race. But, in the eyes of the EPA and your SPCC plan, this paperwork is the main event.
Think of it this way. Your secondary containment is the goalie. It made an incredible save. Incident documentation is the coaching staff analyzing the game tape. They figure out the shot, why it got through, and how to prevent it next time. This data is key to a strong safety culture.
Regulations like Alberta’s Directive 055 don’t focus on record-keeping for fun. They do it because data has a memory. Detailed logs turn a messy incident into valuable learnings. They show how much product was released, the root cause, and the response actions taken.
Answering these questions does more than satisfy an inspector. It feeds directly back into your Spill Prevention, Control, and Countermeasure plan. Your SPCC plan is not a static binder on a shelf. It’s a living document, a biography of your facility’s relationship with risk. Every incident report is a new chapter.
The EPA expects a closed-loop system. It’s a cycle: Plan, Implement, Monitor. Then, an Incident occurs. You Document it, Analyze the findings, and Update the Plan. Rinse and repeat. This loop turns a company that had a spill into a company that learned from it. The difference is monumental.
So, what exactly goes into this critical documentation? It’s more than just filling out a form. It’s building a narrative for the regulators and a playbook for your team.
| Documentation Element | Primary Purpose | Regulatory Link (SPCC/EPA) |
|---|---|---|
| Initial Incident Report | Captures the “who, what, when, where” immediately after discovery. It’s the first draft of history. | Forms the basis for mandatory reporting timelines under the SPCC rule and other regulations. |
| Root Cause Analysis | Goes beyond the “what” to find the “why.” Was it equipment failure, procedure lapse, or training gap? | Directly informs the “Prevention” part of your SPCC plan. It’s the key to proactive fixes. |
| Response & Cleanup Log | Details every action taken, materials used, personnel involved, and waste disposed of. It’s the receipt for your response. | Demonstrates compliance with your own plan and provides a defense against claims of negligence. |
| Plan Update Memorandum | The official record of changes made to the SPCC plan as a result of the incident analysis. | Shows the EPA the loop is closed. The plan evolves, proving the system works. |
| Regulatory Submission File | A curated package of all above elements, sent to the appropriate agency as required. | The tangible proof you are playing by the rules. It’s your formal communication with the EPA. |
This table isn’t just a checklist. It’s a workflow. Skipping a step is like building a containment dike but forgetting the sealant. The integrity of the whole system is compromised.
The clever facility manager uses incident documentation as a strategic tool. It’s your evidence of due diligence. It’s your blueprint for operational upgrades. When an inspector asks, “What did you learn from the event last quarter?” you won’t fumble for words. You’ll hand them a file that tells a story of control, analysis, and improvement.
In the end, great documentation does something paradoxical. It makes a significant event seem routine—because you were prepared for the paperwork as much as the spill. The containment held the liquid. The documentation holds the lesson. Don’t let either one get away.
Procurement checklist and spec language
Our hard work leads to one key moment: the purchase order. A careless buy can result in a poly sump that melts with your solvent or a drum containment pallet that’s too small.
Your procurement checklist is your last line of defense. It must cover material compatibility. Check the manufacturer’s technical data sheet to see if it matches your chemical’s hazards. Also, ensure it meets SPCC or local fire codes.
Make sure the size is right. Does it hold 110% of your largest container? For structural specs, think about the weight. If you’re stacking full IBC totes, get the load rating.
Don’t forget about environmental ratings. Will it stand up to UV rays and freeze-thaw cycles outdoors?
The spec language in your purchase orders must be precise. Never just order a “spill berm.” Instead, specify a “UV-stabilized polyethylene secondary containment berm with a 500-gallon capacity and chemical resistance to hydrocarbons.”
Be the wise one who uses exact words to avoid trouble. This checklist turns our whole conversation into a real, compliant fortress. It’s the blueprint for your drum containment reality and the last line of defense for your IBC totes.